Sunday, January 21, 2018

#124 - Friday, January 19, 2018 - My Old Friend, DSLR

The forecast promised another clear, moonless night, but I also had an astronomy outreach event that night at the local museum where our club meets, so I brought my camera gear in the car and headed out to the observatory right after.  Well, almost right after - I always end up chatting with people for a while!  I got out there around 9:15 PM and got set up.  Kind of late, but hey, it's a Friday night, so I can sleep in the next morning.

I decided since it was going to be a short night to image with my DSLR.  I also wanted to see how processing the Pacman Nebula went so I could adjust exposure times if needed.  I didn't get to image the Christmas Tree Cluster/Cone Nebula region (NGC 2264) last winter, so I'm hoping to get a good image of it this winter!

After getting the field of view where I wanted it for the image (which took some effort since I couldn't see much of the nebula with all of the light pollution in the subframes), I hunkered down inside the warm room for a while.  My USB thermometer reported the temperature inside the dome as 29 degrees F, which felt quite warm after the single digits and teens we've been having, but there was a pretty stiff breeze.  I only opened the slit as far as I needed to to try and keep the wind out while I was in there.  After 20 minutes, I went to check on my images - everything was good.  After another 40 minutes, I went to check on things, and some thin, high clouds had rolled in!  I went back inside for another half hour to see if they would clear, but it only got worse, so I packed up and went home around 11:30 PM.


Christmas Tree Cluster/Cone Nebula region, single 300s frame on my Nikon D5300 through a 140mm neo-acrhomat Vixen refractor

Same, but with some thin, high clouds

I have found that it is much easier to see when clouds are in the picture on my DSLR images than my CCD images so far.  

One more thing I want to note is that if you look at the top image, you can see the mag 4.7 star 15 Monocerotis (this nebula is in the constellation Monoceros, "the unicorn," which is just east of Orion), which is the star I used to center the image where I wanted it.  Orientation can be hard to figure out between my cell phone app SkySafari and the camera's field of view, but luckily I could make out a brighter part of the nebula, so then I was able to adjust the position of 15 Mon to be far enough over that I would also catch the Cone Nebula.
If I rotate my phone (with auto-rotate turned off) to horizontal and then with the bottom up another 20 degrees or so, then it lines up with the image on my camera (judging by the star 15 Mon and the brightish section of nebula right next to it that you can see in the subframe.)

Looks like I'll just have to try again later...darn clouds!


#123 - Thursday, January 18, 2018 - Snowed In

After nearly a month of clouds, moon, and bitter cold, I finally made it back out to the observatory!  It has been frigid here lately, but I have acclimatized, so the 20s don't really feel that cold anymore.  I bundled up in my Under Armor base layer, fleece-lined sweat pants, sherpa fleece sweater, coat, fleece-lined hat, gloves, and thermal and wool blend socks tucked into snowboots, and trudged through the snow to the side dome at the observatory where the memorial telescope is I've been using.  The snow was a few inches deep, and someone stole our snow shovel a while back, so I cleared the entrance to the dome with my feet and yanked the swollen wooden door open.  After wrangling with the stiff extension cable that plugs into the main building and successfully opening the dome slit, I got all my gear setup.  I think this was the first time that setup went 100% smoothly - no guiding calibration issues, no hardware communication issues, and the telescope was still in perfect focus from my last trip!  My goal for the night: get green and blue channel images on the Pacman Nebula (NGC 281) so I can finally combine them with the red and luminance ones I took last month to create a color image!

Everything went swimmingly, so I went back inside the main building to the warm room and read a book and scrolled through Facebook, and went out to check on things and rotate the dome about every 40 minutes.  The Pacman Nebula is high and to the north, so I didn't need to rotate the dome as often as I do with something in the south - really only every hour or less, since there is more vertical motion than southward objects (and the slit is vertical).  

After taking 20x300s images on both the green and blue channels, I went home at around 11:45 PM.  I had to be at a middle school science fair I was judging before 8 AM, so I needed to get at least some sleep.  Also, yay for coffee!

The next day, when I copied the images over from my tablet to my desktop, I realized that while I had taken 5-minute subframes that night, my red frames were 10 minutes!  I had forgotten!  I'm told by experienced members of my club that I can just run an auto color-balance routine in Photoshop and it should be fine.  Hopefully there is actually enough light in the subframes to see anything - there already isn't much green or blue in the Pacman Nebula.

I've made some progress on attempting to process the image, but things aren't going so well - color gradients for dayz!  I'm enlisting the help of two of my club's more experienced astrophotographers, and I'll post an updated image here when I get there.  But so far, this is the mess I have created:
Object: NGC 281 Pacman Nebula
Camera: SBIG ST-8300M
Telescope: Vixen NA140ssf
Accessories: L frames: Astronomik CLS filter (2 inches), RGB frames: Astronomik RGB type 2c filters
Mount: Losmandy Gemini II
Guide scope: Celestron 102mm
Guide camera: QHY5
Subframes: 
L: 20x600s (3h20m)
R: 9x600s (1h30m)
G: 20x300s (1h40m)
B: 20x300s (1h40m)
See on AstroBin

I'll keep working on it!  LRGB processing is way harder than processing my DSLR color images!
Once I start getting the process down, I'll write a dedicated post on how to process CCD camera LRGB images.  An exciting part in all this is that this is my "longest" image to date - 8.2 hours total of data!


Friday, December 22, 2017

#122 - Wednesday, December 20, 2017 - Darn, Foiled Again!

This time, I got out of the house on time (almost) - I scarfed down a homemade egg & sausage sandwich, threw my gear in the car, and got out to the observatory a little before 6 PM.  The sky was still darkening, but a few stars were popping out.  I cautiously entered the Asian beetle-infected dome and started getting setup.

Things went fairly smoothly this time - I cranked down hard on the screw holding the drawtube of the focuser in place using my Leatherman, since it tends to slip, took my time centering the Pacman Nebula (NGC 281) in the view and double-checking, and then I started acquiring 10-minute subframes with my red filter in place.  I got 20 wonderful luminance frames back in November, so now I just needed RGB color frames.  I wanted to pack up at midnight, so with my remaining time, I calculated I could get 9x600s subs for each color channel, plus some extra time built in for changing filters and fixing guiding problems.  Guiding got off to a bit of a rocky start (I don't think this scope is balanced for having a heavy camera dangling off the back, so it's got quite a bit of backlash that PHD has to push through first), but then settled down nicely to about 1 arcsec error or less.  The sky looked great.

The club's 140mm Vixen neo-achromat refractor on its Losmandy Gemini mount, with my borrowed SBIG ST-8300M CCD camera attached.

After setting up the CCD camera inside the memorial dome, I next set up my Nikon D5300 on my Vixen Polarie star tracker (see more about it in this post) and aimed it at Orion.  It hadn't quite cleared the trees yet, but I went ahead and started the run and figured I would just delete the ones with the trees still visible later.  Since I don't have the polar alignment module for it, I could only get about 60 seconds of exposure time at 95mm focal length pointing southeast in order to get minimal trailing (there was still some trailing though).  It came out quite nicely.
Date: 20 December 2017
Object: Orion's Belt
Camera: Nikon D5300
Telescope: 50-200mm lens at 95mm, f/4.5
Mount: Vixen Polarie
Subframes: 103x60s (1h43m), ISO-1600
Darks: 60
Biases: 0
Flats: 0
Temperature: 29F

If you go check it out on AstroBin, you can see what all is in this image, including four nebulae and of course, the three stars that make up Orion's Belt!

I went out and checked my gear periodically, rotated the scope, and then switched from the red to the green filter (I have a manual filter wheel that is a lot better than my old one now!).  Around 10:30, I went outside to check again...and clouds had rolled in! D:  I stopped taking images and went back inside and waited about 20 minutes, but it wasn't looking like it was going to clear up anytime soon.  All my forecasts had promised me no clouds until at least midnight.  Oh well...

On the bright side, I did get a solid set of red frames on the Pacman Nebula, and I got this nice widefield of Orion.  

Someday, I'll get a complete CCD images of the Pacman Nebula!


Sunday, December 17, 2017

#121 - Saturday, December 16, 2017 - ♫You Gotta Know When to Fold 'Em♪

Finally, after several weeks of cloudy nights and clear, moonlit nights, a clear, dark night descended upon the observatory.  Four out of five of my forecasts promised clear skies, and ClearDarkSky said 4/5 on transparency (an important measure for if there will be thin, high clouds, which most forecasts don't count as clouds).  And it would be above freezing to boot!  With my D5300 back in hand after getting it repaired at Nikon (see the end of this post), and armed with my new Astronomik LRGB filters for my borrowed SBIG ST-8300M, I headed out late to the observatory after a Girl Scout meeting (I'm a troop leader for a few high schoolers).

From my co-leader's house, I followed Google's directions for the quickest route, which of course were fraught with peril.  It brought me a way I go sometimes, but had me turn on a road after the one I usually turned on - but I decided to see it through to see if it was really faster.  Well, after totally missing the minuscule turn, I turned around in the town just up the road, which was an adventure in itself because the streets were lined with cars and people for some kind of event.  The road it was having me turn down was the road to the Boy Scout camp that is adjacent to the state park, and I hit a dead end.  Now, there may have been a road through the camp that hooked back up with the road I use to get to the observatory, but I didn't necessarily want to drive through the middle of the camp in the middle of the night, so I whipped around and headed back the way I knew.  All in all, I finally pulled into the observatory parking lot at 8 PM.

I missed imaging the Christmas Tree nebula last year, and since I got out there so late, it was already just high enough to start imaging.  After setting up and focusing (and checking that my new filters were, in fact, parfocal - yay!), I started guiding, and...it looked like crap.  I have about 50/50 luck with the Losmandy Gemini II mount that is in the memorial dome in it guiding well - sometimes it is spot-on, seeing-limited perfect, and sometimes it just decides to go visit Crazy Town.  (To be honest, it may not even be the mount, but weirdness with PHD - sometimes if I power down and restart everything, it works great).  After re-focusing the guide scope and trying again, it was still bad, so I gave up and slewed to a different target that was way up high and had already crossed the meridian - the Pacman Nebula, NGC 281, which I got luminance data for last time I was out.  I set it to take a 5-minute exposure on the red filter, and then went to go set up my DSLR on my Vixen Polarie star tracker.

When I came back to check on the test frame, it was super out of focus!  Once again, the focuser on that scope had slipped out, which was a result of me forgetting to tighten the screw on the focuser when I had focused earlier.  So I re-focused on star Caph in Cassiopeia, then drove back over to the Pacman Nebula and re-centered it using the Focus tool in CCDOps (which basically takes back-to-back, low-resolution images for focusing and centering targets - most nebulae have some kind of open cluster affiliated with them that is easy to see in this mode), and then started acquiring 5-minute frames in Sequence Generator Pro.  Finally, I was off to the races!

...almost.  I came back to check on the first two frames, and I had left the Bahtinov mask on...
This is what happens when you start imaging your target with the focusing mask still on the end of the telescope.

So after re-starting my red frames, I set up my DSLR on my Vixen Polarie.  The Vixen Polarie is a little device about the size of a large point-and-shoot camera and attaches to a regular camera tripod.  It's got a little 360-degree rotating head on top to attach your DSLR to, and a boresight hole in the side to sight Polaris through to roughly polar align it.  Then you simply turn the dial to the sidereal tracking rate, and it slowly rotates the camera at sidereal speed for imaging wide-field targets.  It's more well-suited to short focal length, short exposure images, and the rough polar alignment doesn't work that great (there is a $200 polar alignment module available, but that will have to wait till later).  I aimed my camera with a 55-200mm lens set at roughly 135mm at the Orion Molecular Complex area (including the Orion Nebula and Orion's Belt), figured out that 90 seconds was as long as I could do without trailing at that focal length on the Polarie, checked on the telescope one more time, and then finally went inside to eat dinner around 10 PM.

I brought some Southwest beef & bell pepper skillet with me (yup, ripped directly off the back of Kraft Colby & Monterey Jack cheese) (and it's delicious by the way) in a tupperware, and threw it in the microwave, plugged it in and...nada.  The readout was backlit, but none of the buttons worked, the light didn't come on, etc.  Then I remembered the last time I was out there, I reported that the microwave wasn't working, and that maybe the outlet was dead.  Nope.  No hot dinner for Molly.  Then I got an idea...the club has a few dew zappers in the dome room (known to the rest of the world as "hair dryers"), so I went and grabbed one of those.
Desperate times call for desperate measures!

It worked okay - by the time the top was nice and toasty, the lower layer would be back to room temperature, so I finally gave up after about 10 minutes and just ate it lukewarm.  

By the time I was done eating, it was time to go switch to the green filter (I was doing just 7x300s for each color channel so I could still get to bed at a reasonable hour), but some thin, high clouds had rolled in (in fact, two of my compatriots came out to watch the tail end of the Geminids meteor shower, and they had already left as a result).  Given everything else that wasn't going well that night, I decided it was time to call it quits around 10:30 PM.  It was a shame - not that cold, no wind to speak of, and wintertime targets rising.  Oh well, here's hoping for another chance this week before the moon starts encroaching on my first-half-of-the-night hours.

Sunday, November 26, 2017

#120 - Saturday, November 25th, 2017 - Long Exposure

Two nights out this week - yay for long weekends!  I could only stay out until about midnight because I had church the next morning, but with darkness falling so early these days, that still gave me several hours to work with.

I was a little late getting out to the observatory - about 6 PM - but joy of joys, I wasn't alone!  A few of my fellow sky-people were there from the astronomy club!  It was warm for a late fall evening (nearly 40 degrees F), so a few had set up a Meade 127mm apo refractor that belongs to the club, with a Skyris camera for "electronically-assisted viewing."  As usual, however, it was put away by the time I finished getting everything set up and rolling.  But it was nice having other people to chat with in the warm room after I was set up.  I'm usually out there alone.

My new Astronomik LRGB filters are on their way, so I decided to take some luminance data on something with my CLS (light pollution) filter to knock that out of the way.  The moon was nearly at first quarter toward the west, so I needed to keep to the east.  I was going to do M81 & M82, since I'm dying to capture the rich red hydrogen exploding out of the core of M82 that has eluded my red-insensitive DSLR, but there was a tall tree limb blocking it.  So I decided to do the Pacman Nebula instead, NGC 281.  It's an emission nebula in Casseopeia, about 9,500 lightyears away in the Perseus arm of our humble galaxy.  I imaged it recently with my DSLR on its last night alive.

Setup went smoothly - syncing and focusing on Capella, calibrating PHD guiding, and after a few 60-second test images to get it centered where I wanted it, I started a series of 10-minute frames, and then went inside to chat.  I went out about every 45 minutes to rotate the dome.  After 10:30 PM, constellation Orion was high enough for me to want to slew over there and take more data on the Flame & Horsehead Nebulae, but I decided to not be impatient this time and stay the course and get a lot of frames on the Pacman.  It was time for a meridian flip, so I tried out a feature I just recently found in the computer control app for Gemini mounds: "perform meridian flip."  It didn't work quite as I'd hoped, however - it took me to where it thought the nebula was, but it wasn't centered, and was instead down and to the right off the edge of the frame, like it had been before I centered it on the other side of the meridian.  Oh, well.  Even slewing to the same coordinates (I had saved a screenshot) didn't quite work.  It might work better if I actually aligned it with several stars instead of only syncing on one, but the couple times I tried on this mount, the first two stars would take, and when it slewed to the third star of my choice, it would like point at the ground.  So I gave up on that.  Anyway, I got the nebula re-centered (or close to it), and continued the 10-minute exposures.  When I packed up about quarter to midnight, I had 20x600s exposures, or 3 hours 20 minutes of data!  The histogram was completely separated from the left side of the graph, which is good (if part of the peak is cut off by the left end of the graph, then you are losing data), but it was still pretty close to it, nowhere near having too high of background light.

I went ahead and processed just the luminance frames to see how they looked.  I'm trying out some new techniques with stretching and applying the Carboni tools at different points in the editing since I keep enhancing the gradient that exists due to my lack of flat frames.  Also, weird dark areas are appearing around some of my brighter stars, an effect I haven't seen with my DSLR, which might be related to de-biasing of nearby pixels when a given group of pixels has absorbed a lot of photons.  Hopefully my future CMOS-chipped camera I'm saving up for (the ZWO ASI1600MM) won't have this.  Or it may be an effect of processing - I'm going to try some different stacking modes.  Fellow club members think it's because the Vixen scope is not apochromatic, but neo-achromatic, which means it still has the violet halos that achromatic refractors do, they're just smaller.  I see them on my DSLR, and the Carboni tools in Photoshop can clean it up well, but it doesn't quite work for grayscale images.  Also, the weird dark spots don't appear next to every star, and they look different than halos.

Actually, they're easier to see in negative (now as white splotches).
Hmm.  Further research is required.

Anyway, I'm excited to eventually get some color on these images!  The luminance image here, despite its issues, shows amazing detail of some of the globules.  I'm really excited about using something besides my DSLR.  And the noise is practically non-existent, especially when I can run the sensor as -25 degrees C.  Speaking of cold, it was pretty bearable outside until I went out to check on things around 11 PM, and the temperature had dropped quite a bit all of a sudden!  And it wasn't just my imagination; I have data to back me up.
I use a USB digital thermometer to track the temperature - it's mostly important for when I'm using my DSLR so I can correlate light frames to dark frames at matching temperatures, but it's also helpful for context (like, "could the scope have had frost on it?") and for determining what the lowest temperature I can set the CCD chip to, since it can do only about 30 degrees C below ambient.  I have it set to record data in 5-minute intervals.

The moon is waxing, so sadly I'll have to take a short hiatus from imaging until about mid-December, when it comes up bright but late.  In the meantime, I'm thinking about setting up my 11-inch on the back porch so I can investigate what went on with the declination axis during the Hidden Hollow Star Party and see if it does it again.


Friday, November 24, 2017

#119 - Wednesday, November 22, 2017 - Filter Phenomena

Happy Thanksgiving!
I got an early start out at the observatory on "Thanksgiving Eve," arriving out there around 5:45 PM, about a half hour after sunset.  I ate a Jimmy John's sandwich for dinner on the drive, and after turning on the heater in the warm room, I hustled over to the mini-dome where the memorial scope is kept to start getting set up.  I needed to test whether I had finally properly cleaned by blue filter since I finally found my multi-coated optics & filters cleaning solution (exactly where I thought it was, not sure why I couldn't find it before).  However, I realized on the drive there that I had forgotten the USB cable for the camera, since I transferred it from its normal camera bag to my DSLR camera bag, since my DSLR is currently on its way back to Nikon for repair (see log entry #118 for what happened).  Fortunately, I found a spare in the warm room's computer desk.  I started unpacking...and realized I had left the filters at home in my other camera bag too!  So yes, I drove the 25 minutes back to my house to grab them.  (The club doesn't have any imaging filters, at least that I can find.)  So it was nearly 7 PM by the time I finally started imaging.

On my last trip out, I learned that the menu button on the memorial scope's hand controller (a Losmandy Gemini II mount) does't like the cold (I learned over the summer that it doesn't like the humidity either), but I also learned that I have full control over the scope from my tablet thanks to the Gemini Telescope app that comes with its ASCOM driver.  It even has a "perform meridian flip" button that I am super excited to try!  It also lets me use a wider catalog of stars for the initial sync step of the alignment process.  (I don't actually align the mount besides the one-star sync; I haven't had much luck with the alignment working properly, and since it's very well polar aligned, it's not terribly necessary.  I just pick a new sync star if I'm changing areas of the sky between targets. and the gotos are pretty close).  I synced it to Mirach, since my first target of the evening was getting blue data on M33 so that I can finally process it (I have L, R, and G data already from previous trips).  I couldn't see the diffraction spikes from my Bahtinov mask very well during focusing, however, which wasn't a good sign.  I got it close, and then slewed over to M33 to take some test images.  The stars looked better than they have previously (see this post for some background on the blue filter issues), but only in part of the image - they still had weird diffraction-y mess on stars on the other half, it looks like.
Ignore the high noise level; it's a screen grab of an unprocessed FITS file, with the gain adjusted arbitrarily.

So I think the blue filter is shot.  Luckily for me, I have a $125 gift certificate to Oceanside Photo and Telescope for the Astronomical League imaging award I won earlier this year, which I will spend on a set of Astronomik parfocal LRGB filters that I have already picked out.  Having parfocal filters will be nice anyway - with the ones I currently have, I have to slew to a nearby bright star, re-focus, slew back and re-center the target every time I change color channels.  The L filter cuts IR and UV, which don't focus perfectly and can leave your stars looking de-focused.  However, I only have a 3-position filter wheel at the moment, so the additional ease that that brings will have to wait.

Aside: Filters


As I was writing this and researching which LRGB filters I wanted, I decided to find out exactly what I already had - and it turns out the filters I have are not RGB at all, but UBVRI filters used for photometry!  I've been using three, the BVR ones - blue, visible, and red.  The visible filter appears green.  I have the I filter too, which is IR-pass, but haven't used it - I have read that using an IR-pass filter is your luminance channel for planetary imaging can make really sharp images, though, so I may have to try that sometime.  The U is ultraviolet, which I don't have.  I couldn't find much information out there on what exactly the difference is between the two types, but I think the main take-home is that UBVRI uses a standard, well-defined spectrum and is used for scientific purposes, while RGB filter spectra tend to vary by manufacturer.  Below are the two spectra.
Johnson-Cousins UBVRI filter spectrum

Astronomik LRGB Type 2c filter spectrum (the yellow line is the L, or luminance, filter)

A few observations are that the blue and green filters have greater overlap in the RGB spectrum than the UBVRI one; the green and red filters have greater overlap in the UBVRI spectrum than the RGB; and the red UBVRI filter extends much farther into the IR than the RGB set does.  I will note, however, that my red UBVRI filter still provided some very sharp images (sharper than the green and blue, in my opinion) despite passing a decent amount of IR, which in refractors usually has a slightly different focal point than the visible part of the spectrum because they are made for the visible spectrum.

Anyways, moving on.

Moving on: Back to imaging

Since my blue filter still wasn't working, I decided to go ahead and take some luminance data on a few things while I was out there and the skies were nice.  I used my Astronomik CLS filter (a nifty light pollution-blocking filter that does a very nice job, particularly with my DSLR images).  I've been wanting to image the Heart Nebula, IC 1805, so I slewed over to it.  However, it is a bit too large for the FOV (field-of-view) I have in the memorial scope; it's a good 1.8x2.6 degrees to get the whole thing, but I only have about 1.3x1 degree FOV with the SBIG ST-8300 on the memorial scope, which is a Vixen 140mm neo-achromat, f/5.7.  I decided to image just the heart of it (tee hee).  It's in Cassiopeia, so it will be up for quite a while from my latitude.  

Unfortunately, it didn't turn out very well - I had some guiding problems, and it looks like I was ever-so-slightly out of focus.  For some reason, I couldn't get nice diffraction spikes to form on Mirach with the Bahtinov mask.
Date: 22 November 2017
Object: IC 1805 Heart Nebula (central region)
Camera: SBIG ST-8300M
Telescope: Vixen NA140ssf
Accessories: Astronomik CLS filter (2-inch)
Mount: Losmandy Gemini II
Guide scope: Celestron 102mm
Guide camera: QHY5
Subframes: 5x600s (50m) | Luminance Only
Darks: 10
Biases: 20
Flats: 0
Temperature: -25C (sensor), 25-29F (ambient)

Our local professional astrophotographer tells me this one is hard to get even under dark skies.  I'll give it another try with my new LRGB filters on my Borg when it warms up a bit, since it requires more setup (I have to bring my mount and put it together).  The Borg has a shorter focal length (500mm), and thus a wider FOV - 2x1.5 degrees with the SBIG.  We'll see.

After having all the guiding problems, I homed the telescope, power cycled it, and tried a different target - the Flame & Horsehead Nebulae, since Orion was finally up.  Alnitak formed very nice diffraction spikes with my Bahtinov mask, so I was able to get much better focus.  Bonus, I could see the Flame Nebula in 1-second long exposures in the Focus mode of the CCDOps software, which made framing the image much simpler.  (The CCD chip is by far and away more sensitive than my DSLR chip).  I did have to rotate the camera though to put the Flame and the Horsehead side-by-side on the longer axis of the sensor than the shorter one, otherwise you would have a tall and narrow image of this wide scene.  

Now, Alnitak, the left-mode star in Orion's Belt, is a very bright star - magnitude +4.2.  Actually, it's a double star, with its partner being +9.55.  They are only 2.2 arcseconds apart, which at its distance, corresponds with a physical separation of 574 AU (astronomical units - the distance between the Sun and the Earth).  It heavily saturates camera chips, particularly the sensitive CCD chip.  Now, if I was smarter, I would have taken some shorter-exposure frames too, but it wouldn't have mattered because some high clouds rolled in anyway, and there may have also been frost on the scope too (I didn't feel like getting a stepstool from inside to check).  But the shorter-exposure frame would have let me done a better job at processing out the super-saturation of that star.  

Let's make a long post even longer, and I'll walk you through the processing process.

Stretching the Histogram

I haven't really addressed this yet, but I have recently made the switch from doing stretching and initial adjustments in DeepSkyStacker to stretching the histogram in Photoshop instead.  Everywhere I read online, astrophotographers say to avoid doing this in DSS and do it in Photoshop instead.  I finally gave it a try, and I did notice that the noise was much lower by doing it in Photoshop.  Everyone also says that everyone has a different way of doing it, so here's a quick-and-dirty I've seen several people do.

First, open Levels (Ctrl + L).  Move the left slider (black) to the foot of the histogram (but don't cut into the main part of the histogram itself), and the middle slider (gray) to the right end of the main chunk of the histogram.  Don't adjust the right (white) slider, as you will lose star data.  Hit OK, and repeat the process a few times.
For 16-bit images (Photoshop apparently can't do 32-bit), the brightness scale of a given color channel (in this case, since I have monochrome images, there's only one channel) ranges from 0 to 255.  With a raw image fresh from DSS (choose "Embed" instead of "Apply" when you save out the image), all of the data is contained in the narrow spike you see in the above histogram.  You want to "stretch" this data out so it covers the whole 0-255 scale, basically.
Stretch #2.

Stretch #3.

Once you've done a few rounds of this, open the Curves dialog (Ctrl + M).  

Now, if you're used to editing the curves of a color image, you will notice that this one looks a bit different - it's backwards!  I don't entirely understand why Photoshop does this for monochrome images, and it feels like I'm editing the image while looking in a mirror, but you can accomplish the same objectives.  Adjust the curve to your liking.  I find that I get a nice result when I select a black point (the leftmost dropper) in a dark area of the image, and then pull the middle-left end of the curve down to increase the brightness of the dim areas of the DSO.

Dealing with Blown-Out Stars

I followed Dave Rankin's video on how to bring out the Trapezium region of M42, the Orion Nebula, for how to do this.  Basically, what you're going to do is stretch the histograms for both the long exposure (bright) image and the short exposure (dim) image, make them both layers of the same image, and use a layer mask to combine the two.  It works surprisingly well for how easy it is.  I tried it once on some Orion Nebula data I had as well.  I need to use it more often to deal with bright stars.

In my case, since I don't have short exposure data, duplicated the layer (in the Layers box in the lower right-hand corner, I right-clicked the Background layer, clicked Duplicate Layer, and named it "star"), and then used Camera Raw Filter on the "star" layer to reduce the exposure to make Alnitak dimmer.  Normally, instead, you could copy & paste your stretched and adjusted short-exposure image on top of your long-exposure image.  You can change a layer's name by double-clicking on the name in the Layers section.

Next, re-arrange the layers so that the short-exposure one is on the bottom.  (Just click and drag the layer - I had to unlock the background layer by double-clicking the lock symbol in order to do it).  After that, click on the Background layer (your long-exposure image) and click the "add layer mask" button, which looks like a white box with a dark circle in the middle (it's at the bottom of the Layers section).
Now, with the "Background" (long-exposure) layer highlighted, click the Brush tool over on the left-hand side, and make sure the color is black.  "Paint" the area around the blown-out star to expose the short-exposure, less-blown-out image underneath.  Don't go too far into your DSO, or you'll lose data there.
Obviously, that looks ridiculous.  But we're not done yet!  Go to Filters->Blur->Gaussian Blur, and turn it up pretty high - mine was 182 pixels radius.  Click OK.
Date: 22 November 2017
Object: Flame & Horsehead Nebulae
Camera: SBIG ST-8300M
Telescope: Vixen NA140ssf
Accessories: Astronomik CLS filter (2-inch)
Mount: Losmandy Gemini II
Guide scope: Celestron 102mm
Guide camera: QHY5
Subframes: 4x300s (20m) | Luminance Only
Darks: 23
Biases: 20
Flats: 0
Temperature: -25C (sensor), 23-25F (ambient)

All right, so it kind of helped.  I think there was additional haze from frost or something on the telescope objective - I should have checked for it.  Oh well.  I'll bring my dew heaters next time out.  Now flatten the layers (Layer->Flatten Image), and continue editing - noise reduction, Carboni tools, whatever else you need.

I'll try it again soon!

Now, for the rest of the post

It was cold!  As low as 23F.  Guiding worked better after I re-started PHD2, however, and I didn't have to go check on things that often, so I was able to warm my fingers and toes in the warm room.  A bit of a disappointing night, but I'm starting to get my workflow down on imaging with the CCD camera.  Woot!

Wednesday, November 15, 2017

#118 - Tuesday, November 15, 2017 - Baby It's Cold Outside

After a few weeks of cloudy weather and being busy at work, I finally got out to the observatory again last night!  One of the few benefits of wintertime is much earlier darkness.  The sun set around 5:30 PM, and I scrambled to shovel down some food and grab my camera bag.  Thank goodness for the memorial scope out at the observatory - very little setup required!  My target for the evening: NGC 281, the Pacman Nebula.  I originally hadn't realized that this was indeed a northern hemisphere object until a member of my club posted his image of it.  Super cool wintertime nebula I've been missing!  It's in Cassiopeia, so it's up for quite a chunk of the year.

I've been imaging a lot lately with my borrowed SBIG ST-8300M CCD camera, but since it was cold and I didn't want to sit in the cold in the dome and babysit the camera (since I'm still getting used to using it, and I just cleaned my blue filter with some proper solution and need to check that it's working, which will take a little time), I just decided to bring my Nikon D5300 instead and make life easier on myself.  I'll do the CCD when I have a weekend night or something when I can stay out longer, and maybe it's above freezing.  At least there wasn't any wind.

Also, I got my braces off Friday before last, YIPPEE!!

Besides the clouds, it was reasonably dark, and it was really strange to be two hours into my imaging session and having it be only 9 PM.  It was chilly - my digital thermometer said lower 30s, and then dropped to 29 before I left.  The park had a strong smell of rotting leaves, and it was very quiet, since the cicadas have settled down for their long winter's nap, along with most of the other wildlife, it would seem.

Except for the Asian beetle.  The dome was full of them.

If you aren't familiar, they look a lot like ladybugs, but have some subtle differences.  They can help get rid of pests, but they are also aggressive and will bite.  Apparently, there are a lot of them in my area this year.

If you know me personally, then you probably know that I have a strong distaste for insects.  Fortunately, ladybugs are the least freaky to me, so I put up with co-habitating with them in the dome.  It was a little eerie, however, with there being so many.  When I opened the dome slit, it shook the dome, and I could hear dozens of them pitter-pattering as they were shaken from their roosts.  When I smacked the lid of my camera case against the side of the dome, twice as many fell onto it.  A few fell onto my tablet while I was using it.  When I unfolded the camp chair inside the dome and shook it to dump out all the bugs, over 30 must have landed in a wide pile on the floor, and I had to swipe another ten or so off the seat of the chair.  Thank goodness it was dark...Also, the cold made them pretty inanimate.  None flew around, or really moved much at all.

After I got the scope aligned, my camera focused (I'm pretty much the only one that uses that scope, so it is just permanently very close to focus), PHD calibrated for guiding, and the nebula centered, I took some test frames to figure out what exposure time I wanted to use (I ended up going with 6 minutes - much more and the skyglow starts to get too high.  That, and I really didn't think I had any dark frames longer than that in my dark frame library at these temperatures from last year).  Once the images started going, and everything looked solid, I scurried back into the warm room, which had reached a nice warm 68 degrees after I had originally gone in there and turned the heaters on.  We have such an excellent facility!

I went out to check on things around 9:40 PM, and discovered that my tablet had shut down because the power cable had fallen out during setup and the battery had died faster in the cold.  After getting booted back up, I saw to my dismay that the last image had been taken at 9:21, so I missed out on about three images!  Oh well, it didn't take long to get back up and running.

Thin, high clouds threatened my evening, however.  I managed to get about 13 fair images of it before I finally gave up to the clouds and switched back over to the eastern sky, where it was clearer, to image the Pleaides Cluster, M45.   It came out pretty decently, if dim.  I tried stretching the histogram in Photoshop this time instead of processing it in DeepSkyStacker, and the noise came out much lower.  I didn't do a particularly careful job at the stretching, and I applied several of Carboni's tools (see this post), including space noise reduction, light pollution removal, reduce small blue/violet halos (the Vixen NA140ssf scope that is in the memorial dome is a "neo-achromat," which has less color aberration than achromats, but it's still there), and enhance DSO/reduce stars.  Hopefully I can image it again soon with the CCD camera and fewer clouds.
Photo of the Pacman Nebula.
Date: 14 November 2017
Object: NGC 281 Pacman Nebula
Camera: Nikon D5300
Telescope: Vixen na140ssf
Accessories: Astronomik CLS filter
Mount: Losmandy Gemini II
Guide scope: Celestron 102mm
Guide camera: QHY5 
Subframes: 13x360s (1h18m), ISO-1600
Darks: 10 (38F)
Biases: (36F)
Flats: 20
Temperature: 29-33F

NGC 281 is known as the Pacman Nebula for its resemblance to Pac-Man of the classic arcade game.  It's a HII region - HII is a specific transition of hydrogen atoms that produces a characteristic red glow.  It spans about 40 arcminutes, which is a little larger than the full moon, and lies about 9,200 lightyears away from us in the nearby Perseus arm of the galaxy.
From Wikimedia Commons

I started getting the munchies around 10 PM, but I had forgotten to bring snacks.  There isn't usually much food in the fridge (just soda and leftover beer), but I lucked out - there was half a store-bought apple pie in there!  I checked the date - October 21st, which I decided I could live with.  I ate it cold because I prefer the taste of cold apples to warm ones (we do have a microwave in there), and it was delicious.
The red light makes it look more like a pizza or something.  Or radioactive.

I passed the time by scrolling through Facebook, reading my Astrophotography On the Go book by Joseph Ashley, chatting with one of my friends, and chatting on the phone with my sister, while checking the scope and rotating the dome every half hour or so.  Around 11:45 PM, I put all my layers back on and went to go pack up.  Not a bad night!  I'd meant to get 40 or so quality images on the Pacman Nebula and just focus on one target, but ended up doing two, which is fine.  The Pleiades one came out quite nice, besides the super-saturated stars.  I might need to play around with some interpolation or something so they don't just look like blotchy white circles.  It's hard to believe sometimes that stars are always point sources in the telescope when their light gets spread across so many pixels.
Photo of the Pleiades Cluster, also known as the Seven Sisters.
Date: 14 November 2017
Object: M45 Pleiades Cluster
Camera: Nikon D5300
Telescope: Vixen na140ssf
Accessories: Astronomik CLS filter
Mount: Losmandy Gemini II
Guide scope: Celestron 102mm
Guide camera: QHY5 
Subframes: 13x300s (1h5m), ISO-1600
Darks: 41
iases: 20 (36F)
Flats: 20
Temperature: 29F


The Pleiades is an open cluster of about 1,000 stars, although only seven are easily seen, hence its common name "The Seven Sisters."  It lies 444 lightyears away.  The nebulosity around it is actually a dust cloud that is passing through it and reflecting the blue light of the hot, young (100 million years old!) stars.  It is quite lovely, and the dust can be seen with the eye under dark skies in large enough scopes.

In my haste to pack up, I forgot to take bias frames (more about those here), so when I got home, I got to work quickly setting up my camera to take them and some dark frames on my back porch.  I plugged everything in, through it out on the back porch, and went to connect BackyardNikon to the camera.  It wasn't connecting, even though I was sure I had turned the camera on.  The switch was set to On.  Puzzled, I pulled everything back inside to unplug and replug things.  When I pulled out the AC power and went to plug it back in, I saw that something was wrong with the plug.  It looked like it had crumbled.
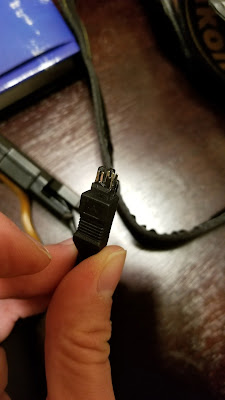
Broken AC power cable for Nikon DSLR.

So I grabbed my other AC adapter and plugged it in instead.  No dice.  Then I grabbed my battery.  No power there either.  It looks like I had probably plugged in the broken adapter in the wrong orientation, since the pieces that prevent it from being plugged in wrong were gone, so chances are good that it fried.  I set it slowly on the table and went to bed.  It still didn't turn on in the morning.  Well, there goes some of the money I was saving for a good astro camera...