For the past several months, I've been using a new workflow for processing my images, which has been working a lot better - I just haven't gotten around to writing it up yet! The biggest change is not using DeepSkyStacker to do any of the post-processing. I've been getting a lot less noise that way, and thus more detail and better color. So I'll just dive right in! I'll start from the top. (Go
here for a tutorial on acquiring images with a DSLR.)
Software
First, let me point out that I am a Windows user. There are tools out there for image processing on Macs, but you won't be able to utilize DeepSkyStacker to do your stacking. I think Linux folks are mostly out of luck on the software front. Although, someone's probably written some Python code to stack images. :)
Viewing
To see my images, I either use the built-in Windows Photo Viewer/Photos app in the case of DSLR raw files, or the free
AvisFV app in the case of FITS files from astro cameras. There are others out there, but these work well. When viewing raw images in the default Windows viewer, wait a few seconds for the whole thing to render.
Stacking
Eventually, I'm going to get PixInSight. Probably sometime this year. But for now, I'm still using good ol'
DeepSkyStacker, which is free. They just came out with version 4.1.1, which also has a 64-bit version, which I am super excited about because I have often run into RAM limitations (32-bit applications are limited to 3.75 GB of RAM, and DSS is limited to only 2 GB unless you do
this weird trick (not spam I promise!) to change a certain environment variable, which requires you to have Microsoft Visual Studio (I can confirm that the Community Edition does, indeed, work.)
However, I have run into problems with both the 32-bit and 64-bit versions of 4.1.1 - with either DSLR images or astro camera images, on both 32-bit and 64-bit, I'm getting weird "holes" in my images, all of these black pixels scattered throughout. Using the exact same settings as the old version, and I even ran the same data through the old version just to check. Something is definitely wrong. So I'm sticking to 3.3.2 for now until I have time to get on their Yahoo group (who uses Yahoo groups still??) to work out the bug. Results may vary.
Post-Processing
Photoshop. Photoshop photoshop photoshop! Until I get a proper astro-image-processing tool like PixInSight or Nebulosity, it is miles and miles better than
GIMP, sorry folks. The Camera Raw Filter in Photoshop CC is worth the $10.66/mo alone, not to mention all the rest of Photoshop, Lightroom, and Bridge that you get with your subscription. And
Noel Carboni's Astronomy Tools plugin for only $20.
Pre-Processing
Before you touch any processing software, go through and check all of your light frames (the frames with your image!). The main thing you'll want to look for is non-round stars. Any streaking or bloating of your stars due to tracking or guiding errors will either a) be rejected by DeepSkyStacker or b) result in an image you're ultimately unhappy with due to bad stars and little detail. It's better to have fewer, high-quality images than many low-quality images. As they say, "Garbage in, garbage out!"
Streaky stars :(
Less streaky stars :)
The other thing you'll want to look for are passing clouds. They'll dull your deep sky object (DSO) and cause a lot of noise in your images from the reflected light. It's a lot easier to see them in DSLR images than astro camera FITS files, so it can also be helpful to check the sky often during your imaging session and pause imaging when a stray cloud floats through.
Passing satellites or airplanes (which are really cool, IMO) are not a showstopper. Some of DSS's stacking algorithms do rejection, so they won't show up in your final image. Keep 'em! (And it's a good thing too, there's a satellite that passes through the Orion Nebula every stinking hour, I swear).
Stacking
I'm not going to get into all of DeepSkyStacker's settings here. I once set out on a research project to use all of its processing options on the same set of data and compare the results. It was a long, tedious process...that I haven't finished. So I mostly just stick to the defaults and recommended settings, with a few exceptions.
I will soon do a tutorial on how to process monochrome LRGB images, but for this tutorial, I'll process a set of DSLR images. Let's process my fourth attempt on the Lagoon Nebula.
We'll take it from drab...
...to fab!
And pull out all of that glorious detail in the process. Remember, image processing is all about revealing the photons that were in your image all along!
First, start by importing your lights, darks, flats, and biases. Read more about what those are and how to get them
here. Note that DSS does not require darks, flats, and biases in order to work, but they will help make your images better.
Protip: use the keyboard shortcut Ctrl + A to select all (be sure to click on one of the files first to make that the active window). I highly recommend splitting up your lights, darks, flats, and biases into separate folders.
After you've imported all your files, click the "Check All" button. (Light frames are automatically unchecked when they're imported; DSS assumes you're going to check them for goodness there, but I find it clunky to use for that).
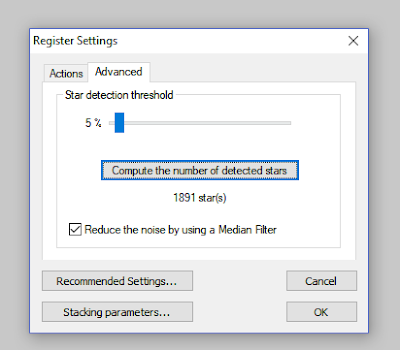
Now click "Register Checked Pictures." I don't normally go here, but if it's your first time using DSS, or your images are coming out weird, you'll want to check what the "star detection threshold" is in the Advanced tab. Usually you'll want 3-10%, they say, but I pretty much leave mine at 3-5%. Basically this is the threshold that tells DSS that the little dot it's seeing is a star and not noise. Pick a percentage and click the "Compute the number of detected stars" box, and it will register the first image and compute the number of stars it thinks it sees in it. Look at the image for yourself and see if its number is about right. For this image of the Lagoon Nebula, a 5% setting says it sees 1,891 stars. That looks about right. If it only said like 100, or said like 10,000, I'd be concerned and would change the threshold and try again. But this looks good. Now, hit Cancel, because I'm going to have DSS register & stack all in one step, which makes for an excellent time to get a cup of coffee or check Facebook. (Or both if you have a slow computer.)
Now, over on the left side of the screen where all of the useful buttons are, click "Stack checked pictures." DSS will give you a summary of how many images you're stacking and their parameters (or a warning box reminding you to check your lights). Take this opportunity to make sure that the ISO of your darks, flats, and biases all match that of your image frames, and that the exposure time of your dark frames matches that of your lights. DSS will helpfully point out these problems for you in maroon text.
Click the "Recommended Settings" button. This will bring up another helpful window with recommended settings that you can conveniently click on to change. It will suggest you use bilinear debayering for short exposures, or AHD debayering for long exposures. It'll give you some options for your darks, flats, and biases too.
I'll walk through my recommended settings in a second.
After making your decisions (or panicking slightly at the number of choices presented to you that you have no idea what they mean), click OK. Then click the Stacking Parameters button.
This is where all of the options live. Here's what I like to do:
- Result tab
- Standard Mode - uses the reference light frame to be the position to which all other frames are set to. I use this one most often.
- Mosaic Mode - stitches all of the image positions together into one large image. I've used this one a few times, mainly for wide-field images that I took on a non-tracking tripod. If your telescope tracks really well, this mode would produce the same size image as a single frame because there won't be any movement between frames.
- Intersection Mode - this takes only the overlapping portions of all the frames. Mainly useful if you have really noisy images, where the overhanging parts of the image will have fewer frames stacked, and will thus be extra-noisy and you'd probably crop it out anyway.
- 2x and 3x drizzle run a super-resolution or interpolation algorithm of some sort that qaudruples or...nontuples? for 9?...the size of your image. My 24 MP DSLR images are already pushing DSS to its limits, and it's already pretty oversampled anyway (the resolution of my DSLR on my 11-inch telescope is something like 0.3 arcsecs per pixel, while the atmospheric conditions in my home imaging location are rarely better than 2-3 arcsecs...) so there's not much of a point, it'll just get fuzzy, even if DSS didn't crash partway through.
- I like to have it attempt to align the RGB channels in the final image. It usually fails, but sometimes it works, which shortens my processing time a smidgen, so why not.
- Lights tab
- These are your stacking algorithms. I usually alternate between "Median kappa-sigma clipping" with the default kappa = 2.0 and number of iterations = 5, and "Auto-adaptive weighted average." I find that auto-adaptive works better on star-heavy extra-wide-fields like the Milky Way than media kappa-sigma clipping, but it won't always completely remove satellite and airplane trails. Sometimes, the result of each of these algorithms produces an image that looks pretty much the same. Experiment!
- Dark, flat, and bias tabs
- I use median-kappa sigma clipping for all. Helps with cosmic rays. You can mess around with hot pixel detection and removal and dark optimization - I haven't really messed with these yet, so I don't have an opinion.
- Alignment tab
- Cosmetic tab
- Don't tick any boxes here - I hear bad things about it.
- Everything else: defaults are good.
Now, finally...hit the OK button, twice! Aaaaaand go get that coffee. Or browse Facebook. Or take a nap, if you're using a non-gaming desktop or laptop. Or, go to work or bed and come back in a few hours if you're using a slooooow machine. My homebuilt rig, "The Beast" I call it (really named Kepler, as part of my physicists/astronomers naming scheme), took 10 minutes to chew through 20 lights, 19 darks, 21 flats, and 20 biases, and it's got 16 GB of RAM, an Intel i7 quad-core (4th gen, admittedly - it's due for an upgrade this Black Friday), and a NVIDIA GeForce 1070 (although, I'm pretty sure DSS doesn't use any graphics card processing. Stacking is mostly a linear math problem, not a vector problem).
Once you're done waiting, you will get a result that is equal parts frightening and ugly. But do not despair! We're only halfway done. You may even get something super dark, or super washed out. Worry not. Your precious photons are there, hiding in the shadows.
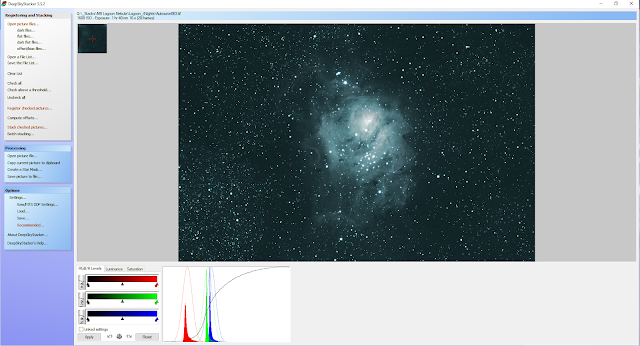
Click the "Save picture to file" button over on the left. Name it something useful, and select TIF - 16 bit. I label mine in this format: objectname_attempt#_DSS#. Object name is either Messier number or name for me, so this one is Lagoon; attempt # is the imaging attempt (each separate time I try to make a complete image, which is usually all in one night for my DSLR images, but can span multiple nights for my monochrome images); and DSS # is the version out of DSS. Sometimes I'll go back and re-stack it, either without flats if they turn out to make it worse, or using different settings. So for me, this would be Lagoon_4_5, since I've already processed it a few times in DSS. Important: make sure you have "embed adjustments in the saved image, but do not apply them" checked, and not "apply adjustments!" You will want to do your histogram stretching and other edits in Photoshop, not DSS.
Post-Processing
All right, now the fun begins! Open up Photoshop. I'm doing this in Photoshop CC 2018, for reference. Open up the image you just saved out of DSS. It'll probably be even darker than the one you saw in DSS, since it was showing it with some adjustments made that I told you not to save. Never fear, the image is indeed hiding in the darkness.
Stretching
Go to Image -> Adjustments -> Levels (or just hit Ctrl + L if you're a shortcut lover like me). You will see that the peaks - where all of your image data are - are quite narrow and off to the left. The different color channels (red, green, blue) may or may not be separated, depending on the light pollution in your area, the composition of your target, whether you were using a filter, etc. Since I used a light pollution filter (an Astronomik CLS filters to be specific), it's got a strong bluish tinge, as evidenced by the fact that the blue and green peaks are farther to the right than the red peak.
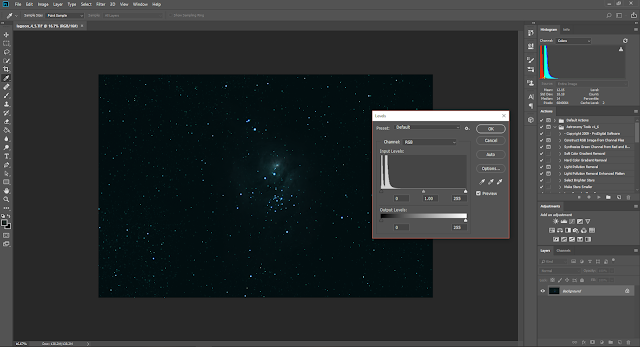
Basically what stretching is going to do is increase the width of the peaks (stretch them) so that your image data take up a wider swath of the available dynamic range of the image. Light is represented in an image on a scale of black to white for each color channel. The left end of the histogram is 0, or black. The right end is shown in Photoshop to always be 255, even if it's a 16-bit image. The source of the 255 is that most displays are 8-bit, and in binary math terms, 2^8 = 256 (255 because in binary, we start counting from 0, not 1). In reality, it's stored as a value from 0 to 1, but it's easier and more precise to work in integer numbers on a scale that isn't too huge or too small.
To stretch the histogram, first drag the center slider (the gray point) to the rightmost edge of where your data is. You'll see your image brighten. Don't worry about "over-brightening" it at this stage.
Hit OK. Open Levels again. Now drag the left slider (the black point) up to the left edge of the data, and drag the gray point slider to the right edge again. Hit OK. Rinse and repeat until you don't really need to move the sliders in toward the data anymore - usually I do this 2-4 times.
The goal isn't to fill the entire range, but just to widen your peaks. If you imaged from a fairly dark location, and you imaged something smaller like a galaxy, your peaks will start out very thin indeed, since most of your image is black.
Note: Only adjust the black and gray points, and don't adjust the white point (the rightmost slider). This will cause your stars to saturate, which can lead to some weird visual effects later. Just leave it where it's at.
If you have black parts of your image due to non-overlapping stacked region areas or things like that, go ahead and crop those out, and then do another levels adjustment or two, since it will prevent you from being able to move the black point all the way up to where your real data are.
Color Balance
Open Levels again, but this time click the dropdown box next to "Channel." In my image, the red peak is basically already at the lowest possible point, all the way over to the left. So the only two we can adjust are the green and blue. You'll ultimately want the peaks to be nearly on top of each other. Of course, if you have an image that is dominated by one color (such as a red nebula), the red peak may end up being a little out in front of the green and blue. Let's see where we end up.
For this image, I'm selecting the green channel first. You'll see there's a huge gap between the left end of the histogram and where the data starts.
We want to close this gap, since space is black, and we want our background to be nearly black (but not totally - we don't want to lose the very dim details the camera barely picked up). So move the black point in toward the left edge of the data. Moving the gray point in and out will change the width of the peak. Do the same for the blue. In order to color balance, you'll be bouncing around between the three color channels until a) the histograms mostly line up, and b) you get a color balance you mostly like (you don't have to get quite all the way there - there's another tool I use to get it much closer to how I want it later in the process).
I like to hit "OK" after making a few adjustments so that they save, and then keep working. It's easier to undo things that way if you end up in a place you decide you don't want to be.
Your image will probably get fairly dark again in this process - worry not. It might get too dark to tell whether it's color balanced, so you can come back to this part later.
Curves
Next, go to Image -> Adjustments -> Curves (or hit Ctrl + M). Here, instead of just adjusting the black and gray points, you mess with the luminance curve for either the image as a whole, or for each color channel. Some people like to do their stretching here instead of in Levels.
To brighten up the image, I usually grab the middle of the line and drag it upward.
Now I can see what's going on a little more. You can make multiple adjustment points along this line, although I find that hard to do. I'll usually make and adjustment, hit OK, and then come back in and make another adjustment. The line will re-flatten each time, re-calibrating if you will on the new version of the image.
Now that I can see the image better, it's more obvious that I'm still not color balanced. So I open up Curves again, and go to the red channel in the "Channel" dropdown. I pull in the black slider to get rid of the background (don't pull in too far yet though, since you'll cut out dim data from your target), and then I drag the middle of the line up. Now my image is redder! But maybe a bit too red. So I go into the green and blue and make some adjustments there too, moving the curve up and down, sometimes further to the left of center to get into the meat of the data.
This is the part where you get to just start messing around. There is no formula for getting a scientifically accurate image here. Astrophotography is a blend of science and art - for as many different astrophotographers are there are out there, you'll see as many different versions of the image celestial body. Check out my brief treatise on "fake vs real"
here.
Again, you don't have to get the color balance exactly right - there's another tool I'll point out later on that I use to get my final level of happiness on an image.
The Carboni Tools
I mentioned at the top of the post a set of tools for Photoshop by Noel Carboni called
Astronomy Tools. They are fabulous and totally worth the $20. Plus, you can copy the files over to another computer of yours, if you're like me and have both a laptop and a desktop. (The Creative Cloud subscription I have gives you two licenses - a blessing for when I go to star parties and can't take my desktop!). Carboni's tools include a number of helpful macros, including "Light Pollution Removal," "Make Stars Smaller" (particularly useful for Schmidt-Cassegrains, which tend to make stars a little bloated), "Deep Space Noise Reduction," "Reduce Small/Large Blue/Violet Halos" (particularly useful for achromatic refractors, like the Vixen 140mm I frequently borrow from my astronomy club), "Lighten Only DSO and Dimmer Stars," and much more. Because the Lagoon Nebula here is so big and bright, I'm just going to apply the "Deep Space Noise Reduction" tool. I'd normally also do the removal of blue/violet halos, but for this image, because the nebula is so bright, it's actually going to create small "holes" around the stars, so I'm just going to leave it the way it is.
While the tools run, a number of temporary images or dialog boxes may appear. There's no progress bar, so just be patient. You can tell it's done when all of the temporary images, temporary layers, and dialog boxes are gone, and usually Photoshop will replace your cursor with a spinny wheel for some portions of the process. To see what the action just did, click the History button over on the right (go to Window -> History if you don't have that button showing).
You can step backward in time here to see how a recent edit changed the image. Keep in mind that for the Carboni tools, or any other macros you have, it won't show it as the name of the action - it'll show all of the steps that action took. So you'll need to skip back several steps, usually to just before a Paste or something like that. The last thing I did was a Curves edit, so I'll go back to there to see what difference the Carboni tool made. To see differences in noise, you'll want to zoom in.
Before the "Deep Space Noise Reduction" action
After the action
The difference is subtle, but there. Now, let me show you real quick what I mean by the "holes" left from the blue/violet halo removal process.
Many of the stars in the image do see improvement, but in the brightest parts of the nebula, now I have these weird sort of greenish halos around the stars from where the blue was removed. This process works great for smaller or dimmer DSOs, but isn't ideal in this image, at least in my opinion. So I'll go into the History window and back up.
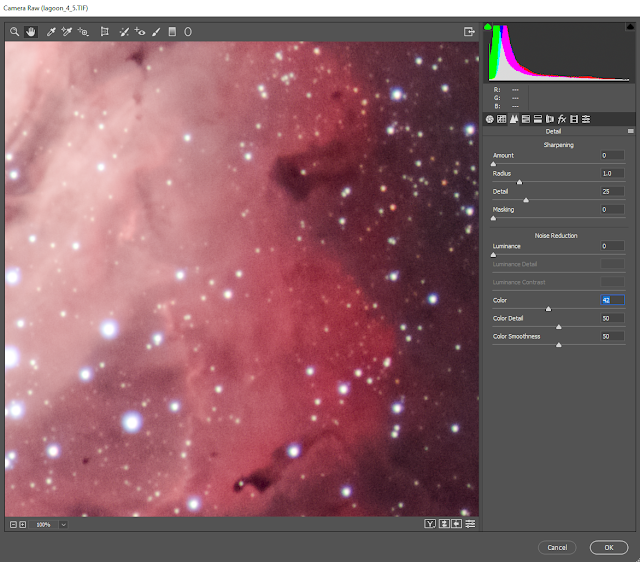
Camera Raw Filter
Basically, Camera Raw Filter is what sold me on a Photoshop subscription. It is really meant to edit raw images - if you take images in raw format on your DSLR, it saves a ton more information, and you can literally edit the exposure time, contrast, color temperature, etc, as if you were changing the settings on your camera before taking the shot. It's amazing. I took an over-exposed image of some clouds over the mountains in Glacier National Park one time, but since it was a raw image, I just brought down the exposure, and got all the cloud detail and sky color back as if I'd taken the image with a lower exposure. Bonus, I could select only the sky, and leave the mountains at the higher exposure so I could see them in the dimmer morning light.
Your astro image out of DSS isn't raw, but the Camera Raw Filter is still a powerful tool.
Go to Filter -> Camera Raw Filter (you'll need to install it via the Creative Cloud updater app), or hit Ctrl + Shift + A.
There are several tools here. First, I'll mess with the exposure a bit, just to see if I can get a little more dim detail without blowing out anything. Small adjustments here. Contrast as well. Then I'll usually pull down Blacks a bit to get rid of the last bits of light pollution, although be careful with this if you are editing an image of a nebula that is likely to have very dim background nebulosity, or galaxies with dim disruption material, like the Whirlpool Galaxy.
Clarity and Dehaze (recently moved from the Effects tab to the Basic tab, as of roughly this past April) can sharpen fine details. Don't overdo it. Zoom in if necessary.
You can bump up Saturation a bit here. Again, be careful!
Now, edit the color temperature. By alternately adjusting Temperature and Tint, you can usually get to a really good balance. I usually have a really hard time balancing galaxies, especially when I use my light pollution filter, but I've had pretty good success getting the stars to be white by adjusting these two sliders. Sometimes I stumble upon a correct-looking balance in Levels, but usually not. Here, I find it much more often, and more quickly.
Aaaand finally, click the Detail tab (the little mountains icon). This is Photoshop's magical de-noising algorithm. DSLRs are noisy as heck, and this tool will save the day! First, it's imperative that you zoom in for this part - I usually just go to 100% (the zoom is down in the lower left corner of the window). You can click the hand tool at the top of the window to pan around to find a good spot - pick somewhere with some fine detail. Now, our brains are far more sensitive to luminance noise than color noise, so if you adjust the color noise slider, you won't see much of a difference. In a tutorial I watched on this tool a while back, they said to move the Color slider to about the middle. I still do this, and I haven't found a good reason not to yet, so I'll tell you to do it too. Then, adjust the luminance slider. Now, be mindful here - go too far to the right, and sure, all your noise will be blurred out, but your fine details will be too. So you have to strike a balance.
No noise adjustment
Too far - fine details are lost
Just right!
When you're all done, hit OK.
Conclusion
Now, go back and look at one of your single frames, and compare it with the final result. We have not added any false data, or performed voodoo magic (well, I take that back, I still kind of consider stacking to be some sort of magic) - this beautiful image was buried in the data all along!
Before
It just takes some work to coax the photons out of the noisy, light-polluted background! And a little color balancing to overcome the camera's limitations. And a little denoising. And now we have this beautiful image!
Many amateur astronomers I've met who have tried their hand at astrophotography are quickly discouraged by poor results. In the single frames they take, they can barely see the object, or the colors are all messed up, or there's so much light pollution, streaky stars, noise, etc. But putting a lot of care into processing the data is almost more important than the care you put into acquiring the data. Once you've got a stable setup, with or without autoguide capability, you've got to put some time into stacking and processing your images in order to make all the time and money you spent on your setup worth it. And it is totally worth it - the image is really there, you just have to bring it out! All of your hard work pays off when you get a jaw-dropping image of an object that really exists out there in space, whether that's a nebula or a galaxy or a cluster of stars. And recall, this was taken with an entry-level DSLR, unmodified, from a fairly light-polluted location (I can barely see the Milky Way on a clear summer night)!
Astrophotography is hard, but totally totally worth it!
If you have questions on anything, please comment and I'll add to the post, or message me on
Facebook!


